Yesterday, I wrote about our relaxing weekend spent in Rome visiting dear friends. However, I would be doing you a disservice if I did not give you a tour of the Weldon's stunning loft in the downtown district. They are on the top floor (read: high ceilings and great views!) of a historic building overlooking the beautiful sites of the city -- charming main street, the old clocktower, the river, and more.

Leigh wanted their new place to be a welcoming and comfortable home. But, knowing that this was not their "forever home" -- she wanted to work with the furniture they already owned and update the look with accessories, lighting, pillows, and artwork. To do so, she worked with a local Rome designer.
First up? The entryway. This dramatic entryway sets the tone for the entire loft. Leigh's husband, an avid hunter, had one request for their first home together: his first buck had to hang on the wall. He agreed to store the other bucks, gators, ducks, etc -- but this buck was a must. (See the priority he placed on the buck when they moved to Rome!)

Leigh was not excited about bringing the outdoors into her decor-- but she conceded to his only request. We had many conversations about ways to incorporate/hide the looming deerhead. Like this pin I showed her on Pinterest. (Technically, animal is in!) Leigh was even less excited when she discovered that the only place the buck really fit was in the entryway. The first thing guests would see. Great.
Fast forward a few months and enter her decorator. He accessorized around the deer and her existing console table to create a stunning entry. He created a symmetrical look with a two-toned mirror flanked by lamps with enough height to balance the tall ceilings.

The driftwood accessory, the only other natural element in the arrangement, ties the deer into the look nicely.

The upholstered bench adds weight to the entry display -- and also gives Leigh additional storage (for such important items as wrapping supplies).


This weekend, Leigh claimed that of all the decorating she has done in her new home -- the entryway (with the buck!) was her favorite. Isn't it funny how that happens? Sometimes you just need an outsider's perspective.
Stay tuned for posts on the living room, kitchen & dining room, master bedroom & bath, and guest bedroom & bath.
What's your favorite part of this room?
Ashley


 Everett's shower was inspired by his soon-to-be black, white, and yellow giraffe nursery. Paige picked out some killer fabrics for my mom to sew into bedding, curtains, and cushion covers for the rocker.
 Guests were welcomed to the shower at Josie's gorgeous home with this door sign created by my mom. She was inspired by a picture she had seen on Etsy and my brother's love of books. She picked up some inexpensive books from the thrift store, a canvas, and a jar of decopage. I love how it turned out.
 For the tablecloth, we used some of the fabric that was destined to be used for curtains. (We were able to capitalize on EV's early arrival!) Patty, Kim, Josie, and myself were able to put together a delicious menu of lunch foods...if I do say so myself.


 I am normally against silly baby shower games, but I loved this idea from Josie. She wrapped a box and filled it with 20 small "diaper bag items". I created submission sheets on card stock to distribute to guests upon their arrival. Guests filled out the sheet with their guesses throughout the party. Prior to opening gifts, Josie pulled out the items one-by-one from the box. The guest with the highest number right won a $10 Starbucks card. Who doesn't love a good prize?
 For decor, we simply hung a clothesline with onesies and giraffe print outs. Patty and Kim made tissue paper puffs in yellow, black, and white to hang from the light fixtures.
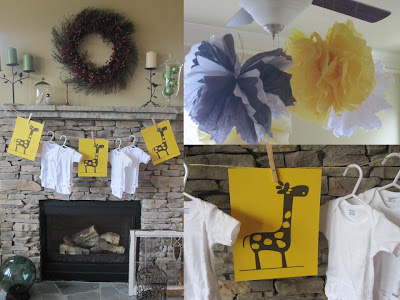 The hostesses and Paige -- celebrating a successful shower just days after Everett's surprise arrival!
 For a party favor, I made giraffe-shaped sugar cookies using a cookie cutter I found for $1 at