Showing posts with label Recipes. Show all posts

Thursday, April 4, 2013

{recipe} Crock Pot Creamy Tortellini Soup

I love to cook and try out new recipes, but during the week I am a big fan of quick, easy recipes that I know forward and backward. 

I am an even bigger fan of recipes where I can just toss all of the ingredients in the crock pot in them morning and have a delicious dinner come evening.  However, I have found a lot of the crock pot recipes I've tried to be just okay.  They are either super heavy, bland or just "meh". (That's a real technical term.)

I came across this unbelievably easy (as in so easy that I am almost embarrassed to share it) recipe for Creamy Tortellini Soup from the Little Fellows blog on Pinterest recently. 

I tried it out exactly as posted and thought it was good - but I made a few changes to better fit our family's personal tastes.

  • Added an extra 1/2 cup of chicken stock (can sub vegetable stock or water), because I wanted it to be a little less heavy and more soup-like.
  • Did not drain the tomatoes.  Again, I wanted the final result to be a little thinner.
  • Subbed shrimp for the sausage to lighten up the recipe a bit. To make sure that the shrimp is not overcooked, I added raw shrimp with 45 minutes left to cook.
  • Added a full bag (6oz) of spinach - but think it could take even more.
You literally just dump a bag of frozen tortellini, two cans of diced tomatoes, raw spinach, cream cheese, shrimp, and chicken stock into the slow cooker and let it cook for 4 hours - no chopping, browning or anything.  It takes less than 5 minutes - how great is that?

Photo taken part way through cooking.  Cream cheese is still melting.

Crock Pot Creamy Tortellini Soup

Ingredients:
1 19oz bag of frozen cheese tortellini
1 6oz bag of fresh spinach
2 (14.5 oz) cans of Italian style diced tomatoes
1 8 oz block of reduced fat cream cheese (cut into smaller chunks)
4.5 cups of chicken broth
1/2lb to 1lb of raw shrimp (I thawed whatever I had in the freezer)

Add all ingredients except shrimp to crock pot.  Cook on low for 4-6 hrs.  With 45 minutes left of cook time, add raw shrimp.

Serves 6-8

I thought that this recipe would be perfect to share on this rainy, cold (April!) day in Georgia.   Here's to a warm weekend!


Wednesday, February 22, 2012

Recipe Recap

Remember how I was trying 3 new Pinterest recipes last week?  I am happy to report that I followed through!  You already heard my reflections on the Mexican Chicken Casserole.  Here is my review of the other two:


I would say...eh.  It's okay.  In all fairness, I did mess up the recipe a little.  The directions say to cook it on low for 3-4 hours or high for 1.5-2.5 hours.  In the daze of my sinus infection last week, I cooked it on high for 4 hours.  Whoops.  Let's just say that the chicken was VERY browned.  Luckily, thanks to cooking it in the crock pot, it was not charred and was still edible. 

I just didn't really like it.  However, I am not really a sweet sauce person.  Ryan liked it (while admitting it would be better if a little less....cooked) and thought we should try it again.  I served the leftovers to my mom, aunt, and cousin on Thursday, and they all liked it too.  (Aren't I so nice?  Serving leftovers to house guests?) 

Grade: B- 


Yum!  (With some additions.)  This is what I love about blogging.  I posted that I was going to make this, and Ryan's sweet Aunt Sheila in Houston sent me a note to tell me that she'd had friends who had tried the recipe and that they recommended the following:
  • Use the entire zucchini, more bell pepper and Pete's Hot Sauce
  • Add 2 zucchini, 1 red and 1 green bell pepper, "fiesta" corn, green chilies, half an onion diced, lime and cilantro. She also added that next time she would add another can of black beans to give more protein.
I was all geared up to add more black beans, another pepper, green chilis, and lime--- but I TOTALLY forgot to stop at the store during my daze drive home.  So, I had to use what I had on hand.  I added 2 extra zucchini, the entire green pepper, and a whole onion.  I also spilled my entire thing of instant rice on the floor (it was a great night), so I had to use the Trader Joe's seasoned rice I had on hand. 

The result was pretty delicious.  (Sorry-- I forgot to snap a picture!)  And, I absolutely LOVED how easy this meal was to throw together.  I think it took me all of 15-20 minutes.  (Note: My veggies were chopped on Sunday when I prepped for the week.) 

The flavor of this recipe was definitely more Italian savory, and I think I was expecting more of a Mexican skillet.  So for next time, I plan to add more black beans, substitute the fire-roasted tomatoes for diced tomatoes with green chilis, and add cilantro and lime.  (Ryan really liked it -- but he suggested that adding some sort of meat-- pork, sausage, bacon, shredded chicken -- would make it extra delish.)

Grade: A+ (with the changes)


Sunday, February 12, 2012

Weekend Update

Oh hi there, neglected blog.  I promise to become a more regular blogger one of these days...

This weekend was both busy and relaxing all at once. 

Saturday morning we visited with my parents and my grandma ,who was in town from Florida.  As usual when my parents are here, Ryan and I dragged them from room to room soliciting advice on everything from frame sizes to bookcase construction to furniture placement.  (I'm pretty blessed to have an interior decorator mom and extremely handy dad and husband!) 

The rest of the afternoon consisted of running errands to Home Goods and Home Depot.  (To all of my MBA friends at Home Depot-- we had the most helpful, friendly experience ever.  I know it must be all of your hard work at the corporate office!) 

That night we met up with our dear friends, Maggie and Tim (also an employee of the big orange box!) to devour burgers and shakes at Flip Burger. (Yes, for the second time this week.  Yes, we have a problem...)

Though Saturday was fun and relaxing, Sunday was the type of productive day that, though busy, is also energizing and extremely satisfying.  After church and a quick trip the grocery store, we got down to business. 

For me, getting down to business meant taking down my winter decor, redecorating the vacated spaces, serving as Ryan's construction assistant (more on this later), prepping meals for the week, and cooking dinner. 

In what I may later deem an overzealous effort, I am attempting three new Pinterest recipes this week: Mexican Chicken Casserole, Slow Cooker Honey Sesame Chicken, and Zucchini, Black Bean, and Rice Skillet.  To make my week easier (and it more likely that I cook during the week), I went ahead and sliced, diced, and prepped everything I need for the meals this week:


Throughout the day, I was on call as Ryan's construction assistant, as he started building the bookshelves I've been wanting for our bedroom today.  (Back in January, we met with my mom and put together a design plan for our room.  Look for the "before" pictures soon!)  Check out my skills on the table saw!


Here's the progress of the bookshelves so far:
(Our black lab, Katie is right there to help.  Always.)


Finally, I got started on my first Pinterest recipe of the week.  First up? The Mexican Chicken Casserole. We have small group on Mondays, so I needed a recipe that produced yummy leftovers for tomorrow night. The recipe took about 45 minutes of hands-on time (which was a little longer than I expected) and then 30 minutes of cook time.

The result? Served on a plate, the dish looks like a yellow and white pile of mush (forgot to snap a photo!). However, it tastes delicious and is a low-calorie Cooking Light meal. Ryan loved it.

Consensus? Let's keep this one in the rotation.


Look for posts on the master bedroom before pictures, Pinterest recipe recaps, and my pillow sewing project soon.  Have a great week!


Monday, November 14, 2011

Recipe: Chocolate Dipped Peanut Butter Pretzel Cookies

Victory tastes so sweet!  My beloved Georgia Bulldogs beat up on the defending National Champions, the Auburn Tigers, to continue our quest to win the SEC East (Sorry, Melissa!).  All that stands between us now is a W over the Kentucky Wildcats next Saturday.  Go Dawgs!

Ryan and I spent the day in Athens tailgating and cheering on our team with dear friends and family. (Hi, Liz & Lindsay!)  A special thanks to my brother for providing an unfailingly fabulous tailgate setup.


What did I bring to share?  After careful perusal of my Pinterest boards Friday, I decided to make these sweet treats: Chocolate Dipped Peanut Butter Pretzel Cookies.  They were delicious! The recipe made 65 cookies -- and there was not a crumb left by game time.  I guess that means everyone agreed with me?

(Side note: I actually discovered that I pinned the recipe twice...I guess that means they really sounded good to me.)


The original recipe was on the always delicious baking blog, Two Tiny Kitchens.  I pretty much followed her recipe exactly (though a little less sugar).  One thing to note if trying this out, I made the cookies the night before, and they definitely tasted better the next day.  I am not sure why -- I guess that the flavors needed to meld together.

Ingredients

1 cup creamy peanut butter
2 tbsp softened butter
1/2 cup powdered sugar (give or take)
3/4 cup brown sugar (give or take)
Pretzels (you will need about 130 pretzels)
1 bag  semi-sweet chocolate chips

Directions
Step 1:
Combine peanut butter and butter in a large bowl with whisk a stand mixer.  Add the sugars and mix to combine.  If the filling rolls easily into balls without sticking to your hands (note: roll in your palm rather than your fingertips to reduce stickiness), you are ready for Step 2.  If not, add a little more of each sugar until you reach a consistency that is easy to roll.

Step 2:
Roll filling into small balls (approximately 1 tsp), then sandwich them between two whole pretzels.  When all the balls are rolled and sandwiched, place the tray in the freezer for about half an hour.

Step 3:
Pour the chocolate chips into a microwave-safe bowl and heat at 30-second intervals, stirring occasionally until completely melted.  (Note: You will need the entire bag.)  Remove the pretzel sandwiches from the freezer and quickly dip each cookie into the melted chocolate.  When all are dipped, return the tray to the freezer to set up completely.  Store the sandwiches in the refrigerator until serving time.

Yum!

Want to see what others brought to share?

My mom made this incredible (seriously, I could not stop eating it...notice the missing bottom right corner of dip?  Whoops!) 7-Layer Greek Dip she found on Pinterest.  (She substituted Tzatziki sauce for the cream cheese base.  Delish.)


My friend Liz brought this tasty Fruit Salsa with Baked Cinnamon Chips.   The fresh, crisp flavor of the fruit was such a nice change from your regular tailgate fare.  I ate quite a bit of this too... 

(Note: I am not sure if that's the exact recipe Liz uses -- but it is very similar.  She says she uses all sorts of different fruit depending on what's in season.)


Food, football, and friends?  An all together great weekend.  What's your favorite tailgate recipe?

Tuesday, October 18, 2011

Healthy Slice of Life: Autumn Spiced Almonds

My friend Brittany has an incredible healthy living blog, A Healthy Slice of Life.  I look forward to reading her posts each night as they are delivered to my inbox.  She has a great outlook on eating and exercising right, helpful tips, and tasty recipes (including great freezer ready meals for my expectant mom friends out there).  Best of all, she is funny, honest, balanced, and completely transparent about her own life.  Please check it out!


 In addition to her blog, she also has a one month-old precious baby girl.  With the new addition on the way, Brittany incorporated a lot of information on her blog about pregnancy, specifically about eating right and preparing for a little bundle of joy, that was both insightful and entertaining.  Isn't Hailey precious?

Anyway, the reason I bring up Brittany and her blog....

Yesterday, she made my day...TWICE.  First, she gave me a call out in her blog.  Being the avid reader that I am, this alone made me smile.  You see, on Friday I posted a status update to Facebook touting the amazingness of the new Planter's Pumpkin Spice Almonds my mother bought me as a treat.  I am a sucker for all things pumpkin...pumpkin cranberry bread, pumpkin spiced lattes, pumpkin pie, toasted pumpkin seeds...  Nothing says fall like a little pumpkin! 


Anyway, Brittany saw the post.  She "liked" it.  (Duh.)   And then in true Brittany-style, she showed  her readers how to MAKE them at home.  Here is a sneak peak at the making of Autumn Spiced Almonds from a Healthy Slice of Life.  For the full recipe, visit Brittany's site.  I can't wait to try these for myself this weekend!

Wednesday, October 5, 2011

Cheesecake Filled Strawberries

You asked, and you shall receive! Many of you saw a photo of these delectables that I posted to Facebook and requested the recipe. I am embarrassed to share how easy they were-- but here you go:


During our family vacation at the beach in August, my Aunt Lynne introduced us to the refreshingly sweet wonder of the Cheesecake Stuffed Strawberry. She found the recipe on Pinterest and added it to her 1,803 pins. (That's a fact. She's a Master Pinner. Unlike most of us, however, she actually tries many of her pins. Remember this?)

The original source for the recipe is the lovely blog Sugar Derby. I adapted some of her directions (ever so slightly) and made these tasty treats for the Georgia v. Coastal Carolina tailgate.


Tools:


  • Strawberry Stem Remover: This thing makes life so easy. (Again, thank you, Aunt Lynne!) However, you can use a knife if you want. I like my Chef'n Strawberry Huller. (Available at Williams-Sonoma for $7.95)


  • Sandwich Size Ziploc Bag

  • Electric Mixer


Ingredients:


Two cartons of fresh strawberries

8 oz. pkg of light cream cheese, softened

1/2 c. powdered sugar
1/2 tsp. vanilla

1 sleeve of graham crackers (optional)

1/2 c. mini chocolate chips (optional)


  1. Wash strawberries and remove stem and core with either the corer or a knife.

  2. With the electric mixer, beat the cream cheese, powdered sugar, and vanilla until smooth.


  3. Scoop cream cheese mixture into the ziploc bag and seal-- making sure that all air is removed.


  4. Use scissors to cut the bottom corner of the ziploc bag to create a piping bag. You will only need to cut a tiny opening.

  5. Squeeze the cream cheese filling through the opening to fill each strawberry.

I stopped there, because I was transporting the strawberries on an hour car ride and wanted them to look their best upon arrival-- no smears, uneven distribution, etc. However, you can go on to the next steps if you wish:


  1. Crush graham crackers in another ziploc bag. Dip the filled end of the each strawberry in the crushed graham crackers.


  2. Melt the chocolate chips in the microwave until smooth upon stirring. Use the spoon to drizzle chocolate over the finished strawberries.


  3. Place in refridgerator until chocolate is hardened.

The final step is always the same-- serve and enjoy!


What's your favorite easy tailgate recipe?

Monday, October 25, 2010

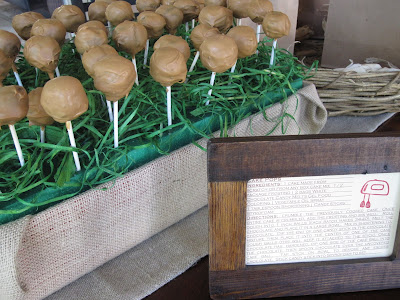
Recipe: Cake Pops

Since my last post, I have had several readers and friends ask me to post the recipe for cake pops. You might ask, "What is a cake pop?" They are just that-- a delicious cake-based lollipop. I have to thank my mom for introducing me to these tasty treats, and my dear friend Maggie for conquering my first batch of cake pops with me.

[Leigh and I enjoy a cake pop...or three!]


Cake pops are great for parties or any other festive occasion. My friend Jennifer asked about making them as a favor for her daughter's first birthday party-- what a great idea! Simply cover the cake pop with cellophane, add a themed tag that says "thank you", "congratulations", or whatever the occasion may warrant, and tie it off with a pretty ribbon. The end result is a simple and inexpensive, but adorable party favor. An added bonus? Cake pops make for a great display that can add to your overall party decor.

[Tailgating cake pops my mom made for the UGA game. Love the football field-inspired holder.]

I am almost embarrassed to tell you how easy they are to make. I will tell you, however, that while easy, they are relatively time consuming. I recommend allocating plenty of time if this is your first attempt. These little delicious desserts can be made the day before and stored at room temperature.

What do you need?

- 1 cake made from scratch or from any box cake mix (I opted for the box!)
- 1/2 container of frosting (yep, store bought)
- 2 bags of chocolate candy melts (pick these up at Michaels or Hobby Lobby-- any color will do)
- 1 Tablespoon shortening
- Approximately 50 candy sticks (again, found at Michaels or Hobby Lobby)
- Block of styrofoam large enough to hold 50 cake pops

Directions:

Bake cake according to package instructions. Allow cake to cool completely. Crumble the cooked cake into a large mixing bowl. Once entire cake is crumbled, add the frosting and mix well.

Roll cake mixture into 1-inch balls (each batch makes 35-50 cake pops). Place cake balls into the refrigerator to chill. (This helps keep the ball in one place later in the process.)

Melt the chocolate and place it in a large bowl. Mix shortening into melted chocolate. (This is an important step, because it gives the chocolate a creamier, easier-to-work-with consistency.) Dip the end of one candy stick in the chocolate mixture and then place it into the center of one of the cake dough balls. (This step will keep the cake ball attached to the stick.) Again, return the cake balls to the refrigerator to help the stick set. (This is not a must-- but I think that it helps keep the cake balls from falling off.)

Once chocolate has hardened, dip one side of the cake ball into the chocolate, then spoon chocolate over the uncovered portion of the cake ball. CAREFULLY, tap stick on bowl to remove any excess chocolate. (Maggie and I learned the hard way that if you tap too hard-- the cake ball falls off the stick. The good part? You can taste test those!)

Place cake pop into the styrofoam to set.

See? Easy-peasy.

Want to take it to the next level? Cut the styrofoam to fit in the lid of a copy paper box. Wrap the box top in a fabric that fits the occasion. Spray paint the styrofoam to match, noting that you must use special spray paint that can be used on styrofoam. (I picked mine up at Michaels.)


[Remember that football field? Here, I wrapped the box in burlap for Kristen and Joe's fall-themed wedding shower. Perfect!]

Inspired? Are you going to try it for yourself? Send me your pictures! I would love to see and post all of your creations.

Have a great day!

Ashley

Friday, March 19, 2010

Friday Recipe: Beer Mop Brisket

In honor of this BEAUTIFUL weekend, today's Friday recipe is for my dad's Beer Mop Brisket. I love a good brisket, and this recipe is one of my favorites. Please note that this recipe requires overnight refrigeration, so be sure to plan accordingly. Now-- Get outside and get grilling!


Ken's Brisket Rub

¾ cup paprika

¼ cup ground black pepper

¼ salt

¼ cup sugar

2 tablespoons chili powder

2 tablespoons garlic powder

2 tablespoons onion powder

2 teaspoons cayenne

View full recipe

Combine ingredients in small bowl. Apply rub evenly to 8 to 12 pound brisket; reserving one tablespoon for basic beer mop. Place brisket in plastic bag and refrigerate over night. Remove from refrigerator 45 minutes before grilling or smoking.

Basic Beer Mop

12 ounces beer

½ cup cider vinegar

½ cup water

¼ cup oil, canola or corn

½ medium onion, chopped

2 garlic cloves, minced

2 tablespoons chili powdr

2 tablespoons onion powder

1 Tablespoon Ken’s Brisket Rub

2 teaspoons cayenne pepper

In a saucepan mix together mop ingredients and warm over low heat. Use to baste brisket coated with Ken’s rub.

Grill and enjoy!

Have a wonderful weekend! (Mine will be filled with studying for finals-- maybe I can at least study outside??)

Ashley
View full recipe

Friday, March 12, 2010

Friday Recipe: Cream Cheese Fruit Dip

Today's recipe is an embarrassingly simple treat. However, my weekend plans involve a baby shower. When I am hosting showers, I always try to include a few relatively easy, crowd-pleasing treats to complement the more involved dishes. This is a great go to recipe for showers, tailgates, or any other type of gathering.

I hope you enjoy!

Cream Cheese Fruit Dip

1 8-oz. package cream cheese, softened

1 7-oz. jar marshmallow cream

Dash of ginger

1 Tablespoon orange rind


View full recipeMix all ingredients. Use as a dip or topping for various fresh fruit. I recommend peaches, bananas, strawberries, and pineapple.

Note: I like to play with the recipe and add dashes of cinnamon, nutmeg, or vanilla. Great creative!

Ashley

[Photo: McCormick's]

Friday, February 26, 2010

Friday Recipe: Seafood Salsa

In light of yesterday's posting about the excitement surrounding the approach of Spring. I decided to post one of my ALL-TIME favorite Spring/Summer recipes: Seafood Salad. My mom has made this forever, and I have no idea where the recipe originated. I don't care. It's just good.

A few tips:
1- If you have a vegetable chop, like this one from Williams-Sonoma, this recipe is a breeze! I love mine (a gift from my mother-in-law), and I would highly recommend it!


2- I like the salsa best after it's been refrigerated overnight. It's fine to eat it right away, but I think that the flavors meld together better with a little time.

3- This recipe makes a ton!

Enjoy!
½ lb small cooked shrimp (often called salad shrimp, very tiny)

½ lb. crab meat (I used canned but they do sell fresh containers in the seafood department)

2 Large tomatoes, chopped

1 Large yellow or green pepper (Yellow is prettier if they are not too expensive)

2 T. chopped onion

1 (7 oz.) can diced green chilies

½ c. fresh lemon juice

⅓ c. chopped cilantro


View full recipe

Mix & chill. Season with salt & pepper to taste.

Friday, February 19, 2010

Friday Recipe: Birthday Cake!

In honor of the day of birth of yours truly (which just so happens to be today), I have decided to make the Friday recipe of the day BIRTHDAY CAKE! More specifically, one of my favorite family recipes: CARROT CAKE.

The secret to a really moist carrot cake is using Gerber baby food in the recipe. Please note that I might be just the tiniest bit partial. My grandfather (who was just simply amazing and loved by all) had a long, very successful career with Gerber Baby Food. As a result, my family loves all things Gerber. Baby food is a great secret ingredient in a lot of recipes!

[Note: Check out the picture below of the antique Gerber peas can and Gerber train. My mom collects Gerber memorabilia. That's her as a baby in the swing. My grandpa took that picture when babysitting her. I just love it. Love my family.]


Anyway, back to the recipe...

Gerber Carrot Cake

Ingredients:

4 eggs

2 cups sugar

2 cups flour

2 teaspoons baking soda

1 teaspoon salt

2 teaspoons cinnamon

2 jars junior Gerber carrots (Gerber doesn't use jars anymore. 2 plastic containers=1 jar)

1¼ cup oil

Frosting:

½ box confectioner’s sugar

3 ounces cream cheese

¼ cup butter, softened

½ teaspoon vanilla


Mix wet ingredients first. Mix dry ingredients together and then add to wet ingredients. Pour into greased sheet pan; bake 45 minutes at 350. Cool.
View full recipe

Frosting: Beat together all ingredients.

Frost cake once cooled.


My mouth is watering just thinking about cake! Happy Birthday to me!

Have a great Friday--


Ashley

Wednesday, February 10, 2010

Friday Recipe: Ebelskivers!

For today's Friday recipe, I decided to feature one of our new weekend brunch favorites. My husband bought me an ebelskiver (read: stuffed pancake) pan from Williams-Sonoma for Christmas this year. The pan looks like this:


We finally got the chance to try out this new toy a few weeks ago. I used the Williams-Sonoma ebelskiver mix he bought me to go with it, but you can use any ebelskiver recipe or regular old pancake mix. Here's how it works-- you fill each opening with one tablespoon of mix. Next, you put a drop of whatever filling you so desire. They suggest jams, hazelnut spread, cheeses, etc. We decided to be extra creative and stuffed the first batch with banana slices. SO good. I don't even really want to try anything else. Anyway, after depositing your filling, you top each opening with another tablespoon of batter. The process looks like this:


You then let the ebelskivers cook for about 3-5 minutes. Next, you take chopsticks and roll the ebelskivers over to cook the other side for another 2-3 minutes. See below:


And....they're done! It's that easy! I would highly recommend this pan.


Ebelskivers also make great desserts. For our second batch, I made a chocolate batter and filled it with banana (again) and peanut butter. Ahh--mazing. I love the creativity that this simple pan inspires.


We plan to celebrate Valentine's Day with a big homemade brunch this year, since it falls on a Sunday. I definitely plan to incorporate ebelskivers into the meal. Any filling suggestions?

Also, Williams-Sonoma now has a recipe book full of ideas.
[photos via Williams-Sonoma]

Happy Eating!

Ashley